Saturday, 6 August 2016

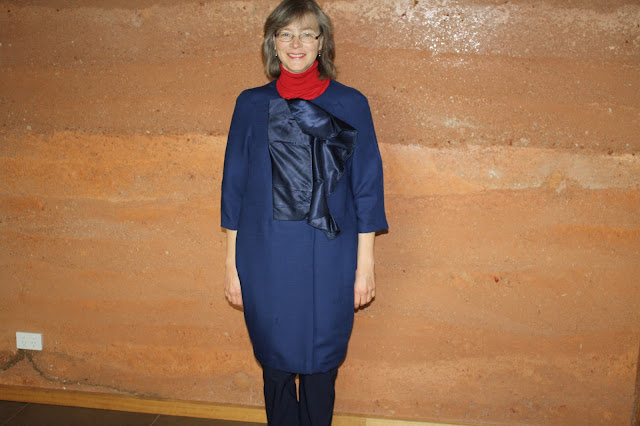
Vintage Style Burda Boule Coat - Finally !


My first hand sewn  coat .  I started this in May so I am more than relieved to be finished .
I seem to be on a bit of vintage kick this year and I fell heavily for the coat on the cover of Burdastyle 12/2011 .  I convinced myself that if I only make one coat why not do something totally different.
The coat is described as having a boule silhouette with 3/4 sleeves . The eye catching insert hides the snap fasteners. The sleeves are in two pieces being extensions of the upper fronts/ back . Inseam pockets are included.


I constructed the coat using all materials sourced from the op shop - from the magazine to the outer fabric , lining , interfacing , satin contrast and snaps !  Who says sewing has to be expensive ?  Admittedly I collected the stuff over many years - the outer wool blend has been waiting for 8 years and initially I was going to make a suit but this coat is far more interesting .

Surprisingly for Burda the instructions were understandable but as this was my first coat I also did some research especially about what pieces to interface , attaching the lining and the hand sewing of hems  . . Once the flouncey insert  was constructed and inserted into the front, the coat was relatively easy to sew . Last post I showed photos of how the flounce was constructed. Inserting the flounce required some care . I thread trace the corners of the coat front to allow accurate sewing and make it easier to see where you are sewing . I sew the along one edge then stop . Snip to the corner of the seam allowance but not too close and then sew along the other edge. This means you can get a really nice looking sharp corner.


I did change the edge finishing of the flounce . Burda said to top stitch along the seam allowance and then trim close to here. However I am never comfortable with unfinished seams ( even on knits that do not ravel ! ) so I did a rolled edge on my overlocker .I  left off the snap at the top of the flounce so this upper corner just flops down and  I also did not cover the snaps because you can not see them and it was the last step and I was getting impatient to finish and wear the coat . I added extra interfacing to the coat - to the front , hems , front facings and upper back and upper sleeves but apart from these changes made the coat as described.

Obligatory flashing the lining with mouth open wide shot. 

To make the coat something that is more me I used a dark navy blue  wool blend . The front insert is left over fake silk dupioni from my suede flounce skirt and not as shiny as it looks in the photos. I am ridiculously pleased with using the dupioni. It was only one metre and 112 cm wide - not enough a single garment - so really required some creative thought on how to use it . To think I was going to send it back to the op shop a few times in the past. I do not have very many lining fabrics and there was only one other choice - a navy floral silk - but I thought that might get made into an outer garment so the bright red garish silk it was ( this is actually genuine silk - a lucky find ) .

I am certainly glad to be finished - I tend to get impatient when things take longer than a few weeks to sew but I am determined to not have UFOs so just keep on .
I will leave you with some photos of  what else has been taking up my free time - my new babies .

This post is already long but I delivered the white one !  With only 20 minutes until I was meant to be at work I had my arm up the sheep trying to  bring down the second front leg so she could deliver normally . I did it ( and got to work on time ! ) . However my daughter ended up calling the vet to deliver the second black lamb who was also presenting incorrectly .  I used to deliver human babies and what I did to the mother ewe was nothing like I had done to a human - poor thing !

Our entire motley flock.

Happy Sewing Janine. 


Costings - Outer fabric $3.00, flounce fabric $0.25 , lining and interfacing $4.50 , notions - snaps and thread $0.50 and burda pattern- nothing ( costs accounted for previously. Total $8.75.
Sunday, 17 July 2016

Fast Fasts , Fabric Stash Busting and a WIP .

I am participating in two groups this year - Pattern Review`s  Fabric Fasting  Forum  and a Facebook Fabric Stash busting Group.  I have been telling myself I have to get some kind of control over my fabrics for years but have been unsuccessful so far . So how am I doing this year ?
Well the fabric fast is a bit of a snort but only a little one . I have bought four pieces of fabric and been given a few as well from Mum and sewing friends . As per usual all my purchased fabrics were from various op shops and included  a Liberty of London print in some kind of soft twill !

The photo above shows from left to right burnout fabric from my friend ( for a Kimono ) , striped patterned georgette from my Mum ( for Simplicity 1280 ?) , peach-apricot silk for a skirt lining , Liberty of London paisley print ( for an infinity scarf ) , red floral cotton voile and a citrus watercolour cotton voile ( both for youngest DD PJs  ) . I will be using the silk for my next project and I intend to make up that infinity scarf quick smart as well so all in all not too bad . ( I have also been informed that gifted fabric does not count towards stashing  )
In terms of fabric stash busting I have used just over 20 metres,  so more out than in !  A success there .
Now I have been sewing too but not as much because my current project is taking sooo long  . I started at the end of May but the end is in sight . It is a vintage styled coat from Burda Style and has a very interesting different looking flounce at the front . I want to show you the evolution of the flounce .

 The above picture shows the flounce pieces cut out and tacked together with the pleats marked out . I have started making the pleats on the right side. Weird looking pattern piece huh ?

 Next up all of the pleats have been formed .

 Now you bring the two sides together , stitching down the middle and  voila !  It really is a little piece of magic . I do not think I have ever seen another pattern piece like it . I have inserted the lining into the outer coat and just need to sew up the hems and attach some large press studs . Hopefully I can get this done before the end of July and the winter weather ( hey it has snowed near where I live a couple of times which hasn`t happened in about 19 years )

Sewing as also been delayed by my new hobby of bike riding - I don`t think I will ever go down the path of sewing fitness wear though  and  hosting a Japanese student . She will be with us until the end of November . Just as one daughter leaves home we fill up the empty spots . Our exchange daughter gave us some KitKats - sake flavoured !  We have also tried green tea flavoured KitKats   ( yum ) and there is sweet potato as well !!


Vive la France .

Wednesday, 22 June 2016

Knipmode December 2013 Vest - A Wadder Saved.


I almost forgot about sewing this long line vest last month . It was almost a wadder and  I felt a bit blah about it so put it aside . However I have a policy of trying not to have UFOs . This stems from my childhood and seeing my elder sister with all her UFOs . My sister is 12 years older than me and started on several magnificent projects which as far as I know are still not finished - a huge zebra cross stitch just in black and white ,  an embroidered table cloth with dancing partners in European traditional costumes and a long length burda wool coat just to name a few . So I try to finish up what I am sewing or out it goes  ( having said that I have a handbag cut out from October last year ! )

I used the vest pattern from Knipmode December 2013 . It has dropped kimono type sleeves finished with bands at the sleeves, front and bottom hem.

I really like long line vests - this is now the third one I have - because they are easy to throw on as a top layer , give a little more warmth in winter and are great for covering up bits you want covered up . I used some fabric given to me by a sewing group pal - she had brought in a few pieces to give away from her mother`s stash . This piece was quite long and I liked the gentle blue-grey wavy pattern with a hint of maroon. It is a knit fabric but with no recovery but I thought it would be good for muslins. 
Initially when I sewed up the vest one front side was much longer than the other -wah ! How did that happen ?  I had tried to be careful sewing on the front bands and not stretching anything out of place . I was ready to toss it because it followed on from my other knipmode wadder . However I put the vest aside and a bit later just chopped off the hem band and evened up the bottom . I applied some iron-on stabilizer to the hem and sewed it up.  Ah much better ! So I continued to finish adding on the lined pockets , button holes and buttons. I have since worn it a few times and like it now !


I am now currently working on a Burda vintage Style Coat which has an interesting and quite different flounce at the front . I have sewn the flounce and hoping once this is set into front coat piece that all will go smoothly . Happy Sewing Janine. 

Costings - Fabric - free ! Pattern - Knipmode December 2013 -free ( used before ) . Notions - buttons , thread , iron on hem stabilizer in stash . Total  - Free ! 

Friday, 13 May 2016

Scrap Sewing - Winners and Wadders .


  I might have mentioned I do not like waste and might be a bit of a hoarder when it comes to fabric scraps . Sometimes Mum also gives me little pieces like the blue patterned  cotton voile  fabric above. There was only 80 cms and I accidentally found an even smaller  piece of blue in my scrap bag which matched really well when I was searching for something else  . It was left over stretch cotton from making my husband a shirt for Christmas 2 or 3 years ago .


I really wanted to make New Look 6187 after seeing some versions on the internet and was able to squeeze this  top out using the two scraps . I used the plain blue for the yoke and tunic back and the pattern for the front yoke and sleeves.


I altered the pattern slightly - 3/4 sleeves because I did not have enough material for the full length and I extended the yoke pattern so I could make a button placket instead of a button/ loop closure. Also instead of using a facing for the yoke and tunic back I managed to eke out some bias binding to finish off the neckline.

Always times for pats in our house.


OK onto the next scrap busting project.  One late insomnia filled night I was perusing Pinterest ( not very good for actually helping one to get back to sleep BTW ) and saw a picture of a sewing machine pocket pad . Brilliant ! If I had a dollar for every time I have knocked my tape measure behind my sewing table then I would  have lots of dollars . I was seriously considering making another scrap top with this checked / little Japanese girl fabric but again only had 80 cms . Well for this project I had plenty of material and I also managed to save myself from making a dubiously appropriate shirt and I have a place for my errant tape measure ( and quick unpick /  little scissors/ glasses /secret chocolate stash ) . I was pretty happy with the result so I sewed two more for my Mum and a friend using all stash fabric, wool wadding and bias binding .

Well they are the winners :)
Now for the wadder :(
I had lots of black based scraps ranging in age from just last year to 10 years old . I wanted to use my Knipmode magazines and found a windcheater where the fronts and backs  consist of  3 pieces each  . I had enough of the various scraps but did not have a good feeling from the start of the sewing . I got the point of the hems and adding a neck band but OH in capitals . Gosh seriously ugly.  Too many fabrics  ,  too many differing textures and thicknesses  , too big , sleeves too dropped .  Most of the failure is my fault but the sweater is seriously oversized and the sleeves very low .


This photo does not do justice to how ugly the top is . Oh well  , I gave it a try and no big loss. However Bruna I do think you are right and these scraps should have been in the bin long ago.
I am off to lick my wounds now and have cut out a Kwik Sew camisole pattern - quick , easy, needed  and made before so I know it will be a success .
Happy Sewing Janine. Costings : Fabric remnants free in stash. Pattern - $3.00 . Buttons and thread in stash. Total - $ 3.00

Sunday, 10 April 2016

Simplicity 2153 - Lemon-Lime Linen Anorak.


Two posts in one day !  I love this casual anorak pattern from Simplicity and then found this lovely hefty soft citrusy coloured linen in the op shop for only $5 - bargain. I thought it would be perfect match for my pattern and it was with caveats.


First of all finding an open ended zip to match was really hard - in the end I found a kind of matching one in a small packed to the rafters haberdashery shop near my Mum's house. However it was 10cm shorter than what was specified for the pattern. I thought about using buttons or adding a placket to conceal a non- matching zip. Then when I came to cut out the fabric I did not have enough ! The tag said there was 2 1/2 metres which is exactly what is needed for the anorak. On closer inspection the tag had 2.1 metres with the 1 crossed off and 2 written down so it looked like 2 1/2 metres. So I had  to shorten the body pieces by 10cm which meant the zip was perfect .
Once all that palaver was through, making the jacket was easy. It is an unlined zip front jacket with 3 collar choices and either sleeveless or with sleeves. There are optional draw strings at the waist and hem and a couple of different pocket designs.
I had to use the smallest collar option and added a drawstring at the waist , the diagonal pockets and tabs at the sleeves and shoulders .


The jacket has enough room to wear over a jumper and is nicely shaped through the middle helped by the adjustable drawstrings .


I really enjoyed making this jacket as much as I like wearing it . The linen package also came with some coordinating plaid which is used extensively inside the jacket- the bias binding along the front facings, the drawstring channel , yoke lining ,  the hem facing ( to get the most of my jacket length ) and pocket linings.
Apart from having to shorten the jacket by 10 cms  I added a yoke lining and added the totally non-functional lining / buttons to the functional pockets. I also shorted the sleeves by 2-3 cm but I think I might need to take off even more -they are quite long .


I found this cool idea on Pinterest to add a lining to the pocket and button up the top part of the pocket


My only complaint about this pattern are that the front facings seem to end in no-man`s land on the yoke so I would change that next time ( oh and the sleeves are quite long ) .

Overall I highly recommend this pattern - It is a great design that you can personalise in so many ways. There are definitely going to be more of these in my wardrobe  - hopefully a winter version if I can find some appropriate fabric.


Happy Sewing Janine. Costings. Fabric - $5.00 op shop . Pattern - $16.00 . Notions - zip $2.50, thread - $3.25, cord and stops - $4.60 , buttons - stash . Total - $31.05.

National PJ Sewing Month.


I couldn`t resist adding in the tag Handmade for a Sweet Little Girl to my teenage DD`s PJs - she did at least appreciate the humour. 

Well it is anyway at my house.
I have sewn more PJs than the number of full nights sleep I had in the first 5 years of my children`s lives. No exaggeration - they were terrible sleepers - hopefully nothing to do with their nightwear !
So I am very tired of sewing that same style easy but plain pattern . Therefore I took an opportunity to make something different - Grainline`s Lakeside PJs .
I only made the bottom part . They hardly took any fabric at all so I was able to squeeze these out of a small remnant less than 50cm I think . I used ready made bias binding because I did not have enough fabric to make my own and the pants took just under 2 metres .
Despite being a bit more challenging than my usual PJ fare they were still relatively easy, the only really tricky bit being the side seams where the bias binding is .
I made size 8 and my youngest daughter loves them. They are comfortable but do not have that excessive ease that the Big 4 patterns can have.  I can see more orders coming in for these from the other DDs .

The longer pair of PJs are a UFO . Now I don`t do UFOS - my projects either get finished or chucked out . This is my youngest daughter`s UFO - so short into her sewing career and already accumulating UFOs ! I have been gently reminding her we could finish these pants up ( OK probably nagging is a better term ) so when she wanted to buy more nightwear I just went and sewed these up myself - only took an hour. The fabric is a Japanese double gauze we bought in Tokyo in 2013 and much too cute to waste - Japanese do cute really really well. In amongst those pink flowers are little panda bears . We used a very old Burda pattern 8785 for the pants - the usual PJ pattern but with added bands at the leg hems and a matching contrast waist band. Again I like Burda for the fact that their patterns fit well .

So 2 new pairs of PJs and now I can get on with the real important business of sewing for myself .

Sunday, 20 March 2016

Vintage BurdaStyle Dress - Indulgent Sewing Frivolity.

It is not very often that I get to sew something a bit more special. Most of my clothes are utilitarian because that is what I need both at work and home. So when my youngest daughter decided to do the school deb I grabbed the chance to indulge in some sewing frivolity . I love my Kwik Sews, Simplicities and Knipmodes for good sewing basics but when it comes to designs with a bit more I turn to my collection of Burda magazines. A couple of years ago I found 10 recent release Burda magazines in an opshop for $20. I raced to the counter heart beating fast and greedily purchased all 10 but it is only now that I have finally made something. ( I also own about another 1/2 dozen Burdas I have picked up over the years at newsagents ) I finally chose a vintage dress reprint in the May 2012 issue .

The dress has a bias cut top with a slim fitting pencil skirt. From the front it is a quite conservative high cut blouson top . The back tells a whole different story !

The back is low cut with the most elegant draping folds. I just love it . I used some pale blue striped georgette with swirls of leaves and small mauve roses . I have had this fabric for about 10 years and it survived a couple of past culls . I only kept it because I have few pieces of material over 3 metres and thought at least it would be useful for making a toile of some unknown dress pattern. However when I saw this burda pattern I knew this fabric would be perfect for it . It is very drapey , the stripes quietly enhance the bias cut top and the soft subtle colouring contrasts with dramatic styling . I mean I don`t want to take attention away from the young slim 16 year old debutantes -ha ha.

I lined the upper bodice with a stretch knit lining as suggested but unfortunately did not have enough for the skirt so I am just going to use a slip . ALso instead of using ribbons at the shoulder seams which did not appeal to me I managed to use another long term resident craft item . Mum gave the beaded , sequinned appliques to me over 25 years ago and I was never quite sure what to do with them but realised they would be perfect for this project . In truth the shoulder seams do not need covering at all - with Burda`s drafting the pleats at the front and back match perfectly and look really lovely left alone .

Burda and I did part ways in the construction of the dress when they started describing lining the bodice. I think Burda was trying to tell me how to line the bodice so all the seams would be neatly concealed but head scratching and peering closely at the instructions did not enlighten me further so I did my own thing and it all worked out . It did mean that to finish the arm holes I used some home made satin bias binding . Also I left small slits at the bottom of the skirt side seams instead of sewing them completely up because I want to be able to walk and parents do also dance at the deb. Overall the dress was not really hard to make at all.

  I am ridiculously happy with how my dress turned out . I might make a matching belt and use a small diamante belt buckle I have but I am on the fence about that as it is not really necessary . I hope I can get some pictures of the deb night too as any proud mother I think my daughter looks stunning in her chosen gown. Happy Sewing Janine.

 Costings - Material - so old I can not remember , Pattern- Dress 133 from BurdaStyle May 2012 - $20 . Knit lining , appliques , thread , invisible zip and satin bias binding from stash . Total - $20 + .