Thursday, 7 September 2017

Purple Peta Pant Pyjamas .

 Over the years I have made lots and lots of pyjamas . In fact if I had one dollar for every pair I have made I would probably be a hundredollaraire . I have used patterns from Simplicity, Burda , McCalls , Vogue and Grainline . Grainline PJs are only short and the fit is good but most of the others are crazy big . You know pants that look like they come from one of those weight loss pictures with someone fitting both legs into just one and shirts which are long enough to actually be nighties.  So when  I found this lusciously soft Lincraft brand 100 % cotton lawn , 3 metres for $5 from the op shop I knew I wanted to make a new PJ set . However I knew it would be a tight fit to get both pants and a shirt with my usual PJ patterns.
I thought using  the Peta Pants from Style Arc might get me there as I have made these twice before ( neither of which made it onto my blog ) and they are a comfortable fit without being too big and baggy.


I was able to get the PJ set cut by using the 3/4 leg version and the shirt was made from a very old McCalls pattern 2764 . I have made the shirt a couple of times before too , over 10 years ago , and recall this was also nicely sized being comfortable but not too loose but didn`t remember how large the collar was ! I made the dartless version and it includes built in facings so it is relatively easy to sew as are the pants .


On the back of my recent tunic failure ( which has now gone to one of my daughters ) I decided to have a bit of fun making the PJs so I added lots of lace to the  hems and a pocket ,  mauve satin bias binding to prettify the pockets ( which no-one will see ) and mother-of - pearl buttons which I love and were the only ones I had to match anyway. These PJs will replace an older pair of another home made set which looked quite glamorous  but were made using some very nasty polyester which frayed , shredded at the seams and made me feel hot and sweaty . Before I could change my mind about getting rid of them I ripped the elastic out of the pants to use in my new set .
I don`t why I haven`t bought more Style Arc patterns because the two I have have been used multiple times and  I would definitely recommend this pattern for pyjamas and day wear pants . Well it is always good to follow up a failure with some success and my youngest daughter said even she would wear these.
PS I cross stitched the pillow on the chair back in  my teenage years when I knitted, macramed , latch hooked,  embroidered , long stitched , painted and sewed . Ahh the days before internet , work , children , animals and housework !
SO is there  anyone else  who likes sewing PJs as much as me ?

Sunday, 3 September 2017

Learning to Trust Your Sewing Instincts .


I  wish I could have just shown this flattering photo of this sewing project but that wouldn`t have been right .


The truth is shown in the bottom photos .
I bought the fabric  from Spotlight on March the 7th 2006   - I found the docket tucked inside ! I know I liked it when I first got it and I had a RTW shirt made out of similar fabric which I wore to death but over the years I gradually became meh about it . Anne Whalley had a recent post about fabric having a use by date and I agree !  But despite my meh instincts about the pink stripey fabric labelled a vintage dobbie I went ahead and used a new to me but very old Burda pattern 8918 . I really liked the tie neck , bottom hem band and flouncy sleeves which are a nod to the current sleeve fashions and thought this might be enough to overcome the fabric shortcomings .


There are a few reviews about the place for this pattern and they mentioned too tight sleeves so I used a narrower seam allowance and found they were fine but as for the rest of the tunic , well  not fine ! I am barely a B and it was too tight around my bust - this just never happens to me . Also there is quite a bit of pooling  of fabric at the back and  again this is unusual . The arm holes are uncomfortable and the bias tie neckline sticks out .Also  I realise now that part of the reason I am meh about the actual fabric apart from the fact it has been in my cupboard for over 11 years is that it is perhaps a bit too close to my skin colour . This tunic is definitely in the give away pile but if I had listened to my instincts I would have just saved some precious sewing time and given it away .


On the plus side at least I didn`t use some precious fabric to make this up , I have trialled the pattern and will keep it for now ( perhaps I just have to accept that I need to make a larger size ), it was fun to sew  and I used the very last of my Spotlight fabric .
To lick my wounds I have followed up this project with a usually never fails pair of PJs. Happy to report success there. Hope everyone is well .Janine x

Monday, 14 August 2017

Knipmode Black Spotty Winter Cardigan.


Back to sensible sewing again and you can't get more sensible than this . A black wool mix cardigan in winter to replace another black cardigan that is just about as old as my youngest daughter who can now legally drive and vote and drink. I was getting thoroughly sick of it apart from some emerging holes , runs and droopiness.
I was going to sew another Style Arc Abbey cardigan but after seeing the pictures of my current one from MeMadeMay I decided I was tired of the waterfall front as well . I have a couple of other well used cardigan patterns from Kwik Sew and Butterick but they didn't feel right . I considered buying a McCalls pattern as there are a couple of cardigan patterns which are really popular and look good but this would involve a couple of hours driving there and back to buy what could be a $20 pattern . I revisited my sewing magazines and found a Knipmode one .


This is `vest ` 21 from October 2010 Knipmode , a long sleeved cardigan with slightly gathered  below bust lower fronts and backs with a wide foldover front facing .  I had never considered this pattern before because in the magazine it is very long , just above the knees and to be honest looked like a dressing gown . Then while I was helping my daughter shop for her Year 12 formal dress ( forgive me all ye sewing zealots for not sewing one ) I saw a woman wearing a shorter version and then later at lunch with my niece and her adorable twin baby boys she was wearing a similar style . So that was it !
I shorted the pattern by about 30 cms at least ( I only traced the pattern out 3 weeks ago but I can't remember what I did- getting old ? ! ) and eliminated the pockets and the front tie . I only had 2 metres of this fabric so it was necessary to shorten the cardigan anyway. Ahhh , the fabric is lovely . It is an Alannah Hill wool mix with tiny small dots from Clear It . It was really easy to sew with except the small gathers at the waist are more like pleats.


I was very careful sewing this - using iron-on interfacing at  the back and front neckline and some silk selvage at the shoulders to prevent stretching . I pressed the garment with low heat using a silk organza pressing cloth . The cardgan came together so well and easily , I sewed the sleeves in the round and they fitted perfectly.


For some reason I always get a lot of pleasure from  making a bonus pattern from my sewing magazines that I hadn't considered before and I really love this one . Also this is the last of my Clear It purchases apart from a few buttons so thinking it is time to go back ( no Janine you must keep on stashing busting , keep strong ) .

Saturday, 12 August 2017

Simplicity 2501 -Silly Unseasonal Sewing .


I have a good excuse this time to be sewing a summer top in winter .
I have used this fabric previously to sew this skirt


and then last month the  bottom of this skirt .


I had a largish piece left over with a wide short piece,a longer narrower section and a couple of small scraps.

Rather than put it away in the cupboard where it had already lived for probably over 10 years I was determine to make a top which made sense anyway to match my new skirt . I pulled out a few patterns but it wasn't until the third one that I managed to fit all the pattern pieces on . The secret being that this has lots of smaller pieces rather than fewer larger ones.

This is the third time I have made this now and I realise that each time I have used fabrics where there is not much yardage. So I highly recommend this pattern in general but especially if you have limited fabric . Of course this pattern is OOP and I was shocked to realise that it was released back in 2009. It has a vintage vibe but I really like the gentle peplum . I never got onto the peplum bandwagon a few years back because I don't think they suit me but with this pattern the peplum does not stick out too much .


The front has small pleats in the bodice while the back has darts . The peplum is finished with a narrow hem but I did not follow Simplicity's instructions for this . I use a technique described in threads where you turn up the fabric and sew  a very narrow hem , trim the excess fabric and then fold this up and sew again which encloses the raw edge . Easier and accurate if you sew slowly. I used bias binding to finish the back neck and front facings but ironically I had to buy more thread to do the last couple of buttonholes as result . Should have just overlocked the facings ! I did not use the supplied facings for the armholes ( not enough fabric ) but more bias binding . I love this fabric , linen being a material I have rarely had the pleasure of using but it is all gone now . I think I will ` retire ` this Simplicity pattern now too as even though all three versions are different , they all still reside in the wardrobe and I don't want to get bored of them. 
Happy Sewing Janine. 

Sunday, 16 July 2017

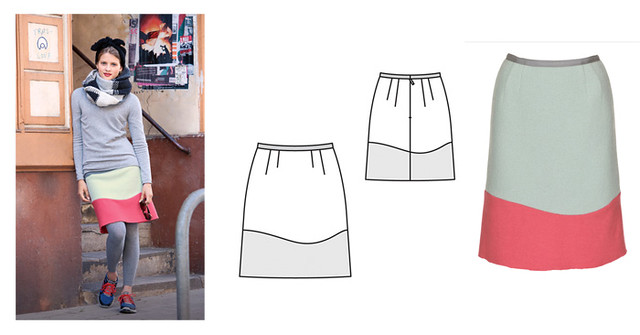
The Wave Skirt - Burdastyle 12/2012 .

skirt front 


I`m still choosing my next projects to sew by trying to get through my recent unused Burdastyle magazines hence making a summer skirt in the slap bang middle of winter. And yes a five year old Burdastyle is recent for me !
I bought this piece of batik in 2010 from the op shop but it was only small - just over one metre in length and only 115cm wide . I also  had this piece of aqua linen bought  from another  op shop but from  years before and amazingly they match really well .(  I have  already previously made a skirt from the aqua linen and after cutting out the contrast waves there was just enough to cut out a top yet to be sewn . )

skirt back 

I saw this skirt in the December 2012 issue and thought it might be an interesting and different way to use my batik . It is a slight A line skirt with 4 darts in the front and back, a centre back zip  and a narrow waist band. The lower bands are gently curved.
I lengthened the main body of the skirt by a few centimetres but did not make any other changes.

right skirt side 

 When I was tracing out the skirt patterns I was lazy and only traced out one back and one front. This made  cutting out the fabric harder because the curves are different on both sides. It meant I was cutting away curves on the tissue paper and then having to add them again when cutting out the contrast bands. It got a bit confusing and I made one mistake luckily rectified. So if anyone reading this wants to make this skirt I would trace out a complete front skirt and two separate backs and follow the layout diagram Burda provides. This would have been much  quicker in the end !
Wave skirt tech drawing
Considering I only had a small piece of batik I was pretty happy in the end with the pattern matching on the back and it is OK on the sides - good enough for me anyway . I will not make this wave skirt again but might make the basic A line skirt pattern . Overall I am happy with the result and only have to wait a few months to wear it now.

left skirt side 

Monday, 3 July 2017

Stay Calm and Sew Ruffles - Burdastyle 08/2012 Blouse 130


Actually that is not really correct - about the ruffles I mean. The description in Burda is as follows - The casual jersey blouse narrows over the hips and has soft appeal. An angled ruffle , lovely bateau neckline and raglan sleeves are all flattering details. Quite a contentious statement in more ways than one  :)  So I know I have really sewn a flouncy top but I liked my post heading :)


Burda lists this pattern as easy to sew and initially I was skeptical about that but it really was. It is  essentially a raglan sleeve top with two extra flounces. 


Above shows the front piece which consists of a lower and upper front .The lower large flounce is laid on top of the lower front piece and basted together and then sewn to the upper front. 


The flounce is then folded so the wrong side shows and the edge basted to the side seam. 


The smaller upper flounce is laid over the lower flounce and basted to the neckline and armscye . The rest of the construction is just like a normal raglan sleeved top so pretty easy. The back is totally plain.  The raglan sleeves consist of two pieces . The neckline is finished with a facing and the flounce edges and hems are left unfinished. The instructions also have the sleeve hems left raw but I couldn`t help but hem at least those ones. 


I had trouble finding reviews for this top. Sharonsews made one and found it to be oversized . This made me a little bit nervous but as I was using a non-sentimental piece of cheap jersey from the op shop I just went for it. I do like to sew using different fabrics and to experiment with different styles . I cut out my usual size 40 but did not add seam allowances to the sides. I found the top to be comfortable but not oversized. However I was surprised by how long the top was. Burda drafts for heights of 168cm and I am just slightly taller than that. My top seems longer than what the modelled shot shows. 
Overall this is a very nicely drafted top with clever details that came together really well. 


Sunday, 18 June 2017

A Sentimental Story about Super Power Fabric !


Most of my fabric stories read as ` See fabric I like , buy it , put it in my cupboard , several years later think gosh that fabric has been there a while , pull it out , cut out and sew `. The story behind this piece of fabric is very similar except for how I came to buy it.
In April 2009 my then 12 year old  middle daughter had to have back surgery . I was allowed to come into the operating theatre and sat with her while the anaesthetist administered a relaxant . He asked her what the name of her boyfriend was and as she opened her mouth to reply she ` fell asleep` . I was  bundled out of the room and then had to fill in 8 hours while she had her surgery ! I was very anxious and did not want to go far just in case . I could have gone to my family`s houses but it would take about 20 minutes to drive back to the hospital ( In Melbourne terms that is just around the corner the traffic is so bad there ).
Only a couple of minutes walk away there is a main street with lots of good shops. After filling in a couple of hours I found a Vinnies shop. Now at the time I really wanted to sew a pussy bow blouse but there were no current patterns available ( there seems to be heaps now ) . To my delight I found a vintage Simplicity pattern for a pussy bow blouse in my size( the op shop only had about 6 patterns ) . And also two really nice pieces of fabric , the silk of my top and some olive linen . I thought the sewing gods were looking after me and that this was a sign everything would be OK with my daughter. Now my anxiety free state lasted about 30 minutes before I started to think what a ridiculous thought that this was a positive sign.
In the end everything was OK . This was the first of two 6-7 hour surgeries she had to have and we somehow got through it .
Now the sewing gods may have been on my side when I purchased this lovely  fabric but they were against me when sewing it !


I used an Ottobre pattern I have used before , a simple little kimono top . This pattern does not need much fabric but I didn`t have much either - 1.2 metres  , 95cms wide . Add to that , in the middle of one end of the piece was a honking big gold painted advertisement Three Golden Somethings ( I can`t remember what crowns ? rings ? bananas ? )However I did a rough check and it seemed OK , so I cut out a piece , chop, chop , chop and then put the other main piece on but it didn`t fit. Oh that`s alright I just have the fabric the wrong way . Um no ! I didn`t have enough . Luckily I had cut the front piece out first ( just luck not forethought ) so I managed to piece the back and bias binding strips  together with scraps  ( with three golden written on my shoulder ) .


I don`t think it is too noticeable and I can`t see it so that`s all that counts !
Then when I was snipping the curves I cut into  the main fabric of the top . I never do that ! I ironed on some mending patch stuff and embroidered a little leaf over the cut to make it stronger .


I just wanted to include a close up of the fabric too . I really love this material and it has been in the very precious to use category . It has taken a while to work what pattern to use because I thought I would have to buy something else to make up a complete garment. Also  I find that after fabric has sat in the  cupboard for a while it  seems easier to sew it up.


Despite all my sewing mistakes I really love this top which is a good follow up to my last ` blah` project .
It matches lots of skirts , pants and cardigans I own . The top itself is comfy with a little bit of ease for growing room and of course it has a sentimental background  . Does anyone else have sentimental feelings  towards their fabrics or think they have super powers ?
Happy Sewing Janine.

Plenty of Pleats -Burdastyle 10-2012 Dress 108. .


Платье

I finished sewing this dress earlier this month and unfortunately I am a bit disappointed.
It is a knee length dress with several inverted pleats starting at the boat  neckline  and which end at the waist line creating a gentle fullness .


I`m not sure if it is the fabric or the actual pattern that is a bit meh for me . The dress takes quite a bit of fabric  so I used some op shop fabric that was in my cupboard . It is a soft rayon fabric and feels lovely but I think the print is quite 90s . In fact I had a dress made out of similar fabric in the early 90s.
The dress also took a while to make because of the multitude of pleats which are in the back as well as the front . I thread traced the pleat markings , then carefully pinned and basted the pleats. After trying on the dress to determine they were a good length etc I did the final stitching.


I have tried to include close ups to show the pleat construction but of course my photography skills are pretty dodgy.
Once the pleats were made the dress was quite simple to construct  . I sewed a lapped zipper and then the side seams. I inserted the sleeves in the round and then there was just the facings and hems to do . It did come together really well as per Burda`s great drafting skills.
However the dress was much larger than I expected . It looks quite fitted ( and beautiful !)  in the magazine pictures. Perhaps the rayon fabric stretched but I took in the side seams by several centimetres and there is still quite a bit of ease.


I have tried to style the dress up by adding a belt and my knee length boots which usually make my outfits look better but I still feel meh about it . However there has been too much time investment in this dress for me to just get rid of it so I`ll give it a go ( and I don`t have that many everyday winter dresses ) and perhaps I will get to like it better.
After sewing this dress I still had over 2 metres  of fabric left but  luckily my friend loved it  so win win for both of us ( and she has darker colouring so I think it will suit her better ) .
I think this is my first real meh sewing for the year . It is one of the difficulties of sewing that we can`t just try on things like in shops and say that works or not so every time we sew something new we are taking a risk time and fabric wise . However even though the dress is not a complete success I still really enjoyed sewing it and that is always a winner in my books.